Uncategorised files
Jump to navigation
Jump to search
Showing below up to 50 results in range #51 to #100.
-
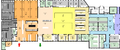
 Areas related to the support zone.jpg 1,067 × 696; 103 KB
-
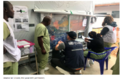
 Autoclave trolley ready for loading (Tygerberg hospital).png 314 × 236; 175 KB
-
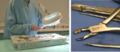
 Automated cleaning.jpg 686 × 512; 66 KB
-
 Automated cleaning (Tygerberg Hospital).png 714 × 312; 524 KB
-
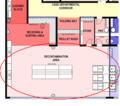 Automated cleaning area.png 1,915 × 1,687; 1.93 MB
-
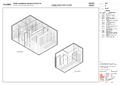
 Axonometric diagram of how the containers would be laid out.png 1,190 × 674; 492 KB
-
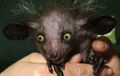 Aye-aye2.jpg 638 × 406; 46 KB
-
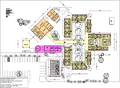
 BARAGWANATH hospital main kitchen layout.png 1,796 × 749; 189 KB
-
 BSA logo.png 205 × 83; 13 KB
-
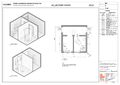
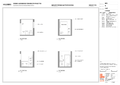
 Baby Change Room (Plan 3D View Elevation).png 1,587 × 1,123; 213 KB
-
 Bed Isolator -Vietnam.png 386 × 265; 261 KB
-
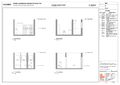
 Bed Unit En-Suite (Elevation).png 1,587 × 1,123; 205 KB
-
 Bed Unit En-Suite (Plan 3D View).png 1,587 × 1,123; 428 KB
-
 Bertha Gxoba hospital cateing service unit.png 1,898 × 1,009; 229 KB
-
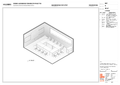 Boardroom Executive (3D View 1).png 1,587 × 1,123; 349 KB
-
 Boardroom Executive (Elevation).png 1,587 × 1,123; 221 KB
-
 Boardroom Executive (Plan).png 1,587 × 1,123; 237 KB
-
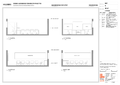
 Body Room (Elevation).png 1,587 × 1,123; 201 KB
-
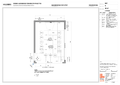
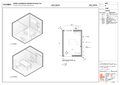 Body Room (Plan 3D View).png 1,587 × 1,123; 386 KB
-
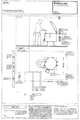 Boiling pan.png 1,318 × 1,980; 218 KB
-
 Breast Feeding Mothers Room (Elevation).png 1,587 × 1,123; 207 KB
-
 Breast Feeding Mothers Room (Plan 3D View).png 1,587 × 1,123; 268 KB
-
 Brickwork sputum booth-layout and detail.png 1,236 × 906; 216 KB
-
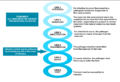
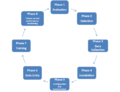 CMMS planning & implementation process.png 1,083 × 829; 51 KB
-
 COVID-19 ACS - protective isolation – bed layout.png 1,436 × 802; 133 KB
-
 COVID-19 ACS – mild-moderate patient bed layout.png 1,440 × 797; 118 KB
-
 COVID-19 ACS – mild-moderate patient shared ward layout.png 1,447 × 1,052; 341 KB
-
 COVID-19 ACS – severe-critical patient shared ward layout.png 1,452 × 919; 289 KB
-
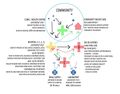
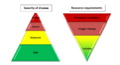 COVID-19 Resource allocation.png 986 × 531; 129 KB
-
 COVID-19 Workflow in large unit.png 604 × 442; 154 KB
-
 COVID-19 Workflow in small unit.png 604 × 433; 151 KB
-
 COVID Ratios of Service.png 1,049 × 167; 30 KB
-
 CSIR generic model illustrating functional separation.png 567 × 418; 156 KB
-
 CSIR generic model illustrating the functional separation.png 616 × 459; 175 KB
-
 CSIR logo.jpg 120 × 61; 1 KB
-
 Capital outlay costs vs life span costs.png 477 × 671; 147 KB
-
 Case study A and B.jpg 2,110 × 1,476; 363 KB
-
 Case study C and BCH proposal.jpg 2,110 × 1,476; 254 KB
-
 Catherine Booth construction, windows and ventilation.png 3,000 × 2,250; 7.79 MB
-
 Ceiling.png 391 × 156; 41 KB
-
 Cementitious board – nail-up ceilings diag.png 414 × 260; 186 KB
-
 Centralised management of MDR TB.jpg 940 × 737; 111 KB
-
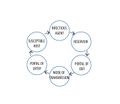 ChainOfinfection.jpg 1,417 × 1,231; 74 KB
-
 Chain of infection.png 1,165 × 800; 85 KB
-
 Change Cubicle Patient ( Plan Elevation).png 1,587 × 1,123; 224 KB
-
 Change Cubicle Wheelchair Accessible (Plan 3D View Elevation).png 1,587 × 1,123; 240 KB
-
 Change Room Staff (Elevation).png 1,587 × 1,123; 253 KB
-
 Change Room Staff (Plan 3D View).png 1,587 × 1,123; 462 KB
-
 Change Room Staff Theatre (3D View 1).png 1,587 × 1,123; 428 KB
-
 Change Room Staff Theatre (3D View 2).png 1,587 × 1,123; 468 KB

.png)

.png)


.png)

.png)
.png)

.png)
.png)
.png)
.png)
.png)

.png)
.png)


.png)
.png)
.png)
.png)
.png)
.png)